


喜讯:国内、香港、海外云服务器租用特惠活动,2核/4G/10M仅需31元每月,点击抢购>>>
![]() 点击这里申请百度智能云特邀VIP帐号,立即体验云服务器BCC>>>
点击这里申请百度智能云特邀VIP帐号,立即体验云服务器BCC>>>
百度智能云服务器BCC使用教程-线上带ofed驱动的实例更换内核方案
概述
线上一些BCC/EBC镜像装有ofed驱动,用户创建带rdma网络功能的套餐的实例后即可直接使用rdma功能。但是ofed是在当前os内核版本下编译的,如果用户改变内核版本后,可能会无法识别具有rdma功能的网卡。这种情况下,就需要重新编译、安装ofed驱动。
本文档提供在不同os的实例上更换内核版本后重新安装ofed的方案。
操作步骤
CentOS 7
以升级内核到kernel-3.10.0-1160.90.1.el7.x86_64为例。
在实例中安装kernel-3.10.0-1160.90.1.el7.x86_64版本内核及相关内核开发包:
yum install -y kernel-3.10.0-1160.90.1.el7.x86_64 kernel-devel-3.10.0-1160.90.1.el7.x86_64 kernel-headers-3.10.0-1160.90.1.el7.x86_64 kernel-tools-3.10.0-1160.90.1.el7.x86_64
有些实例里安装有rdma无损配置包rdma-userspace-config。需要删除该包,等安装好ofed后重新安装:
# 检查是否安装了rdma-userspace-config rpm -qa |grep -i rdma-userspace-config
如果存在就卸载该包 # rpm -e rdma-userspace-config
下载ofed安装包。可以在百度软件源上下载,或者在ofed官网下载后传到实例内:
百度软件源下载,以下载5.8-2.0.3版本ofed为例,在实例内执行下面命令下载
wget http://mirrors.baidubce.com/mlnx-ofed/5.8-2.0.3.0/MLNX_OFED_LINUX-5.8-2.0.3.0-rhel7.9-x86_64.tgz
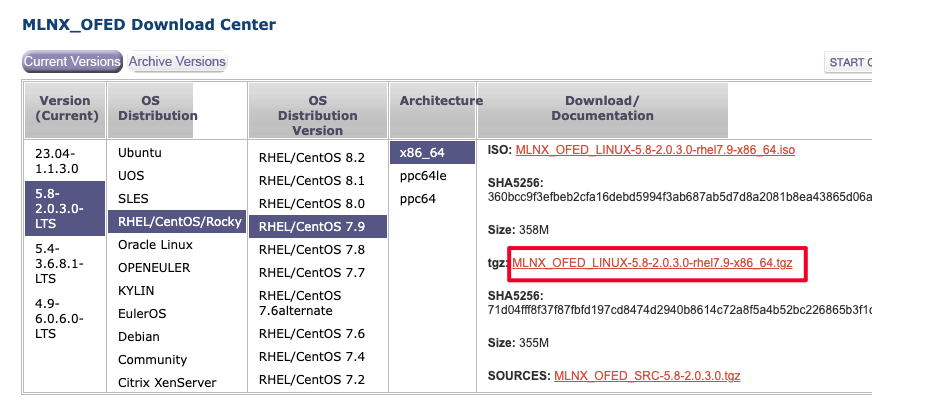
官网下载,在ofed官网下载对应版本的ofed安装包
编译安装ofed
执行以下脚本,编译、安装ofed驱动。
注意,将脚本和ofed安装包放到同一目录下,脚本中ofed版本和内核版本改为实际使用版本。
整个编译、安装过程要半个小时左右。
#!/usr/bin/env bash # Update mlnx ofed drivers # -- Prepare mlnx ofed drivers # -- Extract and install mlnx_ofed_version=5.8-2.0.3.0 mlnx_ofed_drv=MLNX_OFED_LINUX-${mlnx_ofed_version}-rhel7.9-x86_64.tgz kern_ver=3.10.0-1160.90.1.el7.x86_64 if [ ! -d /lib/modules/${kern_ver}/build ]; then echo "There is no kernel build directory. Please check if kernel-devel is installed ..." exit 1 fi if ! which gcc >& /dev/null; then yum install -y gcc fi if ! which make >& /dev/null; then yum install -y make fi # Install Build Requirement yum install -y elfutils-libelf-devel createrepo python-devel redhat-rpm-config rpm-build libtool # Install runtime requirement for all OFED components installation yum install -y tcl gcc-gfortran fuse-libs tk libnl3-devel # Install updated mlnx_ofed packages including kernel modules and userspace packages mkdir update_drivers tar xf ${mlnx_ofed_drv} --strip-components 2 -C update_drivers/ cd update_drivers
./mlnxofedinstall --without-fw-update  --add-kernel-support -k ${kern_ver} --skip-distro-check  --package-install-options "--force" --distro rhel7.9 -q if [ $? -ne 0 ]; then echo "MLNX OFED driver install ... Failed." exit 1 fi cd .. # 82-net-setup-link.rules cause the name of NIC changed. Then disable this rule. if [ -f /usr/lib/udev/rules.d/82-net-setup-link.rules ]; then mv /usr/lib/udev/rules.d/82-net-setup-link.rules /usr/lib/udev/rules.d/82-net-setup-link.rules.orig fi if [ -f /usr/lib/udev/rules.d/83-mlnx-sf-name.rules ]; then mv /usr/lib/udev/rules.d/83-mlnx-sf-name.rules /usr/lib/udev/rules.d/83-mlnx-sf-name.rules.orig fi # Disable rshim(tmfifo_net0) systemctl disable rshim.service rm -rf ${mlnx_ofed_drv} update_drivers rm -rf /tmp/MLNX* /tmp/*.conf
如果第二步卸载了rdma-userspace-config,重新安装回来
wget -q http://mirrors.baidubce.com/baidu/rdma_specs/rdma-userspace-config-v1.0.1-1.el7.centos.x86_64.rpm rpm -ivh rdma-userspace-config-v1.0.1-1.el7.centos.x86_64.rpm service rdma start
重启实例,进入新内核
检查安装
#检查已安装5.8-2.0.3版本并在当前内核下编译出的ofed [root@localhost ~]# rpm -qa | grep mlnx | grep 3.10.0_1160 mlnx-ofa_kernel-modules-5.8-OFED.5.8.2.0.3.1.kver.3.10.0_1160.90.1.el7.x86_64.x86_64
mlnx-ofa_kernel-devel-5.8-OFED.5.8.2.0.3.1.kver.3.10.0_1160.90.1.el7.x86_64.x86_64
knem-modules-1.1.4.90mlnx1-OFED.5.8.0.4.7.1.kver.3.10.0_1160.90.1.el7.x86_64.x86_64 [root@localhost ~]# modinfo mlx5_core filename:       /lib/modules/3.10.0-1160.90.1.el7.x86_64/extra/mlnx-ofa_kernel/drivers/net/ethernet/mellanox/mlx5/core/mlx5_core.ko
alias:          auxiliary:mlx5_core.eth-rep
alias:          auxiliary:mlx5_core.eth
basedon:        Korg 5.17-rc4
version: 5.8-2.0.3
license:        Dual BSD/GPL
description:    Mellanox 5th generation network adapters (ConnectX series) core driver
author:         Eli Cohen <eli@mellanox.com> retpoline:      Y
rhelversion: 7.9 srcversion:     6A14E2ECBAE645B024A60B6 ... #检查网卡 [root@localhost ~]# ifconfig #检查网卡驱动 [root@localhost ~]# ethtool -i ethX #检查软件包依赖,如果缺少依赖包,或者软件包重复,或者其他问题,需要手动解决,安装缺失的依赖包,删除重复的软件包等;  [root@localhost ~]# yum check dependencies
CentOS 8
以升级内核到kernel-4.18.0-348.7.1.el8_5.x86_64为例。
在实例中安装kernel-4.18.0-348.7.1.el8_5.x86_64版本内核及相关内核开发包:
yum install -y kernel-4.18.0-348.7.1.el8_5.x86_64 kernel-devel-4.18.0-348.7.1.el8_5.x86_64 kernel-headers-4.18.0-348.7.1.el8_5.x86_64 kernel-tools-4.18.0-348.7.1.el8_5.x86_64
有些实例里安装有rdma无损配置包rdma-userspace-config。需要删除该包,等安装好ofed后重新安装:
# 检查是否安装了rdma-userspace-config rpm -qa |grep -i rdma-userspace-config
如果存在就卸载该包 # rpm -e rdma-userspace-config
下载ofed安装包。可以在百度软件源上下载,或者在ofed官网下载后传到实例内:
百度软件源下载,以下载5.8-2.0.3版本ofed为例,在实例内执行下面命令下载
wget http://mirrors.baidubce.com/mlnx-ofed/5.8-2.0.3.0/MLNX_OFED_LINUX-5.8-2.0.3.0-rhel8.4-x86_64.tgz
官网下载,在ofed官网下载对应版本的ofed安装包
编译安装ofed
执行以下脚本,编译、安装ofed驱动。
注意,将脚本和ofed安装包放到同一目录下,脚本中ofed版本和内核版本改为实际使用版本。
整个编译、安装过程要半个小时左右。
#!/usr/bin/env bash # Update mlnx ofed drivers # -- Prepare mlnx ofed drivers # -- Extract and install mlnx_ofed_version=5.8-2.0.3.0 mlnx_ofed_drv=MLNX_OFED_LINUX-${mlnx_ofed_version}-rhel8.4-x86_64.tgz kern_ver=4.18.0-348.7.1.el8_5.x86_64 if [ ! -d /lib/modules/${kern_ver}/build ]; then echo "There is no kernel build directory. Please check if kernel-devel is installed ..." exit 1 fi if ! which gcc >& /dev/null; then yum install -y gcc fi if ! which make >& /dev/null; then yum install -y make fi # Install Build Requirement yum install -y createrepo python36-devel libtool python36 kernel-rpm-macros gdb-headless rpm-build elfutils-libelf-devel # Install runtime requirement for all OFED components installation yum install -y tk gcc-gfortran tcsh tcl libnl3-devel perl-Math-Complex cmake-filesystem # Install updated mlnx_ofed packages including kernel modules and userspace packages mkdir update_drivers tar xf ${mlnx_ofed_drv} --strip-components 2 -C update_drivers/ cd update_drivers
./mlnxofedinstall --without-fw-update  --add-kernel-support -k ${kern_ver} --skip-distro-check  --package-install-options "--force" --distro rhel8.4 -q if [ $? -ne 0 ]; then echo "MLNX OFED driver install ... Failed." exit 1 fi cd .. # 82-net-setup-link.rules cause the name of NIC changed. Then disable this rule. if [ -f /usr/lib/udev/rules.d/82-net-setup-link.rules ]; then mv /usr/lib/udev/rules.d/82-net-setup-link.rules /usr/lib/udev/rules.d/82-net-setup-link.rules.orig fi if [ -f /usr/lib/udev/rules.d/83-mlnx-sf-name.rules ]; then mv /usr/lib/udev/rules.d/83-mlnx-sf-name.rules /usr/lib/udev/rules.d/83-mlnx-sf-name.rules.orig fi # Disable rshim(tmfifo_net0) systemctl disable rshim.service rm -rf ${mlnx_ofed_drv} update_drivers rm -rf /tmp/MLNX* /tmp/*.conf
如果第二步卸载了rdma-userspace-config,重新安装回来
wget -q http://mirrors.baidubce.com/baidu/rdma_specs/rdma-userspace-config-v1.0.1-1.el7.centos.x86_64.rpm rpm -ivh --nodeps --force rdma-userspace-config-v1.0.1-1.el7.centos.x86_64.rpm service rdma start
重启实例,进入新内核
检查安装
#检查已安装5.8-2.0.3版本并在当前内核下编译出的ofed [root@localhost ~]# rpm -qa | grep mlnx | grep 4.18.0_348 mlnx-ofa_kernel-devel-5.8-OFED.5.8.2.0.3.1.kver.4.18.0_348.7.1.el8_5.x86_64.x86_64
knem-modules-1.1.4.90mlnx1-OFED.5.8.0.4.7.1.kver.4.18.0_348.7.1.el8_5.x86_64.x86_64
mlnx-ofa_kernel-modules-5.8-OFED.5.8.2.0.3.1.kver.4.18.0_348.7.1.el8_5.x86_64.x86_64 [root@localhost ~]# modinfo mlx5_core filename:       /lib/modules/4.18.0-348.7.1.el8_5.x86_64/extra/mlnx-ofa_kernel/drivers/net/ethernet/mellanox/mlx5/core/mlx5_core.ko
alias:          auxiliary:mlx5_core.eth-rep
alias:          auxiliary:mlx5_core.eth
basedon:        Korg 5.17-rc4
version: 5.8-2.0.3
license:        Dual BSD/GPL
description:    Mellanox 5th generation network adapters (ConnectX series) core driver
author:         Eli Cohen <eli@mellanox.com> rhelversion: 8.5 srcversion:     AED21A09CA345D254692F69 ... #检查网卡 [root@localhost ~]# ifconfig #检查网卡驱动 [root@localhost ~]# ethtool -i ethX #检查软件包依赖,如果缺少依赖包,或者软件包重复,或者其他问题,需要手动解决,安装缺失的依赖包,删除重复的软件包等;  [root@localhost ~]# yum check
Rocky Linux 8
以升级内核到kernel-4.18.0-477.13.1.el8_8.x86_64为例。
在实例中安装kernel-4.18.0-477.13.1.el8_8.x86_64版本内核及相关内核开发包:
yum install -y kernel-4.18.0-477.13.1.el8_8.x86_64 kernel-devel-4.18.0-477.13.1.el8_8.x86_64 kernel-headers-4.18.0-477.13.1.el8_8.x86_64 kernel-tools-4.18.0-477.13.1.el8_8.x86_64
有些实例里安装有rdma无损配置包rdma-userspace-config。需要删除该包,等安装好ofed后重新安装:
# 检查是否安装了rdma-userspace-config rpm -qa |grep -i rdma-userspace-config
如果存在就卸载该包 # rpm -e rdma-userspace-config
下载ofed安装包。可以在百度软件源上下载,或者在ofed官网下载后传到实例内:
百度软件源下载,以下载5.8-2.0.3版本ofed为例,在实例内执行下面命令下载
wget http://mirrors.baidubce.com/mlnx-ofed/5.8-2.0.3.0/MLNX_OFED_LINUX-5.8-2.0.3.0-rhel8.7-x86_64.tgz
官网下载,在ofed官网下载对应版本的ofed安装包
编译安装ofed
执行以下脚本,编译、安装ofed驱动。
注意,将脚本和ofed安装包放到同一目录下,脚本中ofed版本和内核版本改为实际使用版本。
整个编译、安装过程要半个小时左右。
#!/usr/bin/env bash # Update mlnx ofed drivers # -- Prepare mlnx ofed drivers # -- Extract and install mlnx_ofed_version=5.8-2.0.3.0 mlnx_ofed_drv=MLNX_OFED_LINUX-${mlnx_ofed_version}-rhel8.7-x86_64.tgz kern_ver=4.18.0-477.13.1.el8_8.x86_64 if [ ! -d /lib/modules/${kern_ver}/build ]; then echo "There is no kernel build directory. Please check if kernel-devel is installed ..." exit 1 fi if ! which gcc >& /dev/null; then yum install -y gcc fi if ! which make >& /dev/null; then yum install -y make fi # Install Build Requirement yum install -y createrepo python36-devel libtool python36 kernel-rpm-macros gdb-headless rpm-build elfutils-libelf-devel # Install runtime requirement for all OFED components installation yum install -y tk gcc-gfortran tcsh tcl libnl3-devel perl-Math-Complex cmake-filesystem # Install updated mlnx_ofed packages including kernel modules and userspace packages mkdir update_drivers tar xf ${mlnx_ofed_drv} --strip-components 2 -C update_drivers/ cd update_drivers
./mlnxofedinstall --without-fw-update  --add-kernel-support -k ${kern_ver} --skip-distro-check  --package-install-options "--force" --distro rhel8.7 -q if [ $? -ne 0 ]; then echo "MLNX OFED driver install ... Failed." exit 1 fi cd .. # 82-net-setup-link.rules cause the name of NIC changed. Then disable this rule. if [ -f /usr/lib/udev/rules.d/82-net-setup-link.rules ]; then mv /usr/lib/udev/rules.d/82-net-setup-link.rules /usr/lib/udev/rules.d/82-net-setup-link.rules.orig fi if [ -f /usr/lib/udev/rules.d/83-mlnx-sf-name.rules ]; then mv /usr/lib/udev/rules.d/83-mlnx-sf-name.rules /usr/lib/udev/rules.d/83-mlnx-sf-name.rules.orig fi # Disable rshim(tmfifo_net0) systemctl disable rshim.service rm -rf ${mlnx_ofed_drv} update_drivers rm -rf /tmp/MLNX* /tmp/*.conf
如果第二步卸载了rdma-userspace-config,重新安装回来
wget -q http://mirrors.baidubce.com/baidu/rdma_specs/rdma-userspace-config-v1.0.1-1.el7.centos.x86_64.rpm rpm -ivh --nodeps --force rdma-userspace-config-v1.0.1-1.el7.centos.x86_64.rpm service rdma start
重启实例,进入新内核
检查安装
#检查已安装5.8-2.0.3版本并在当前内核下编译出的ofed [root@localhost ~]# rpm -qa | grep mlnx | grep 4.18.0_477 mlnx-ofa_kernel-modules-5.8-OFED.5.8.2.0.3.1.kver.4.18.0_477.13.1.el8_8.x86_64.x86_64
mlnx-ofa_kernel-devel-5.8-OFED.5.8.2.0.3.1.kver.4.18.0_477.13.1.el8_8.x86_64.x86_64
knem-modules-1.1.4.90mlnx1-OFED.5.8.0.4.7.1.kver.4.18.0_477.13.1.el8_8.x86_64.x86_64 [root@localhost ~]# modinfo mlx5_core filename:       /lib/modules/4.18.0-477.13.1.el8_8.x86_64/extra/mlnx-ofa_kernel/drivers/net/ethernet/mellanox/mlx5/core/mlx5_core.ko
alias:          auxiliary:mlx5_core.eth-rep
alias:          auxiliary:mlx5_core.eth
basedon:        Korg 5.17-rc4
version: 5.8-2.0.3
license:        Dual BSD/GPL
description:    Mellanox 5th generation network adapters (ConnectX series) core driver
author:         Eli Cohen <eli@mellanox.com> rhelversion: 8.8 srcversion:     AED21A09CA345D254692F69 ... #检查网卡 [root@localhost ~]# ifconfig #检查网卡驱动 [root@localhost ~]# ethtool -i ethX #检查软件包依赖,如果缺少依赖包,或者软件包重复,或者其他问题,需要手动解决,安装缺失的依赖包,删除重复的软件包等; [root@localhost ~]# yum check
Rocky Linux 9
以升级内核到kernel-5.14.0-284.11.1.el9_2.x86_64为例。
在实例中安装kernel-5.14.0-284.11.1.el9_2.x86_64版本内核及相关内核开发包:
yum install -y kernel-5.14.0-284.11.1.el9_2.x86_64 kernel-devel-5.14.0-284.11.1.el9_2.x86_64 kernel-headers-5.14.0-284.11.1.el9_2.x86_64 kernel-tools-5.14.0-284.11.1.el9_2.x86_64
有些实例里安装有rdma无损配置包rdma-userspace-config。需要删除该包,等安装好ofed后重新安装:
# 检查是否安装了rdma-userspace-config rpm -qa |grep -i rdma-userspace-config
如果存在就卸载该包 # rpm -e rdma-userspace-config
下载ofed安装包。可以在百度软件源上下载,或者在ofed官网下载后传到实例内:
百度软件源下载,以下载5.8-2.0.3版本ofed为例,在实例内执行下面命令下载
wget http://mirrors.baidubce.com/mlnx-ofed/5.8-2.0.3.0/MLNX_OFED_LINUX-5.8-2.0.3.0-rhel9.1-x86_64.tgz
官网下载,在ofed官网下载对应版本的ofed安装包
编译安装ofed
执行以下脚本,编译、安装ofed驱动。
注意,将脚本和ofed安装包放到同一目录下,脚本中ofed版本和内核版本改为实际使用版本。
整个编译、安装过程要半个小时左右。
#!/usr/bin/env bash # Update mlnx ofed drivers # -- Prepare mlnx ofed drivers # -- Extract and install mlnx_ofed_version=5.8-2.0.3.0 mlnx_ofed_drv=MLNX_OFED_LINUX-${mlnx_ofed_version}-rhel9.1-x86_64.tgz kern_ver=5.14.0-284.11.1.el9_2.x86_64 if [ ! -d /lib/modules/${kern_ver}/build ]; then echo "There is no kernel build directory. Please check if kernel-devel is installed ..." exit 1 fi if ! which gcc >& /dev/null; then yum install -y gcc fi if ! which make >& /dev/null; then yum install -y make fi # Install Build Requirement yum install -y perl createrepo python3-devel libtool kernel-rpm-macros gdb-headless rpm-build elfutils-libelf-devel # Install runtime requirement for all OFED components installation yum install -y tk gcc-gfortran tcsh tcl libnl3-devel cmake-filesystem # Install updated mlnx_ofed packages including kernel modules and userspace packages mkdir update_drivers tar xf ${mlnx_ofed_drv} --strip-components 2 -C update_drivers/ cd update_drivers
./mlnxofedinstall --without-fw-update  --add-kernel-support -k ${kern_ver} --skip-distro-check  --package-install-options "--force" --distro rhel9.1 -q if [ $? -ne 0 ]; then echo "MLNX OFED driver install ... Failed." exit 1 fi cd .. # 82-net-setup-link.rules cause the name of NIC changed. Then disable this rule. if [ -f /usr/lib/udev/rules.d/82-net-setup-link.rules ]; then mv /usr/lib/udev/rules.d/82-net-setup-link.rules /usr/lib/udev/rules.d/82-net-setup-link.rules.orig fi if [ -f /usr/lib/udev/rules.d/83-mlnx-sf-name.rules ]; then mv /usr/lib/udev/rules.d/83-mlnx-sf-name.rules /usr/lib/udev/rules.d/83-mlnx-sf-name.rules.orig fi # Disable rshim(tmfifo_net0) systemctl disable rshim.service rm -rf ${mlnx_ofed_drv} update_drivers rm -rf /tmp/MLNX* /tmp/*.conf
如果第二步卸载了rdma-userspace-config,重新安装回来

 湘公网安备43019002001857号
 备案号:
备案号: 客服1
客服1